
DIY Nail Polish Marbled Eggs
Create colorful, marbled Easter eggs using just nail polish and water.
Materials
- Eggs
- Plastic cup or bowl
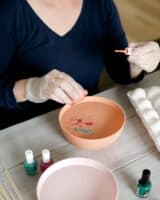
- Nail polish in variety of shades
- Toothpicks or wooden skewers
- Nail polish remover (optional)
- Plastic gloves (optional)
Instructions
- Pour water into bowl or cup and let it come to room temperature.

- Drop lots of nail polish into the water, working slowly at first. If the polish sinks, the temperature isn't right. Add enough polish to ensure it spreads out over top of water.
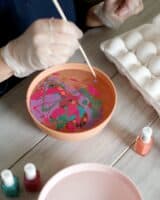
- If you'd like to create more of a swirled effect with the polishes, use a toothpick or wooden skewer to swirl colors a bit.
- Dunk eggs one at a time, holding each between your fingers to cover the least amount of surface area on the egg. Dunk egg straight down into the water, hold for a second underwater and then bring it up. (Wearing gloves for this step helps to keep hands from getting too messy.)
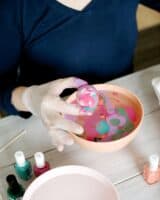
- If you use a larger container, you can roll each egg around under the water to turn it over and bring it up on the blank side to cover all of the egg with polish.
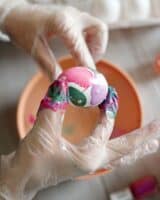
- Place each egg in a carton or on a paper plate and let it dry fully. Enjoy!

Notes
Water should be room temperature for this DIY. If water is too cold or too hot, the polish won't float. Though it's important to note, some of nail polish may sink or disperse slightly on your first few pours. It's helpful to pour slowly and just add a little bit of polish at a time. Once you start to create an initial film of polish on top of the water, it seems to create a thicker surface that helps "support" the rest of the polish you'll be adding.